Menubar


Akkie's Tuin
High, higher, too high?
Oct 30,
2024
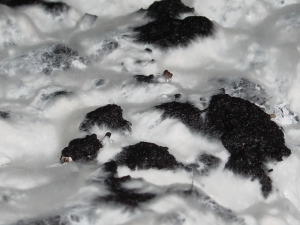
After the last water during the incubation in the casing soil, the grower wants the mycelium to grow onto the surface. To ensure a good…
Picking and calibration
Aug 04,
2024
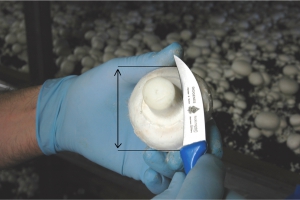
Generally picking is considered by many as a low education job. But on the other hand, we rely on our picking force to deliver a…
And then it's summer!
May 21,
2024
Europe is now at the time of the year summer will burst out. And every year the same growing problems occur at this time, getting…

Water, the ongoing discussion
Nov 30,
2023
If one wants to start a discussion with a grower (or with a consultant), start talking about watering.How much, when and what watering method.To make…

Recognise, isolate and control
Sep 08,
2023
These three principles are the base of disease control on a mushroom farm. To my opinion there is no farm that has not a spot…
A good stagger to meet targets
Mar 27,
2023
The targets for a mushroom farm are amongst others:• Meet market requirements• Good quality at the lowest possible harvesting costsTo meet the market requirements the…
I am losing my quality
Jan 26,
2023
Imagine the third picking day of a first flush. In the morning the pickers are picking a beautiful mushroom. Around noon the mushrooms are starting…
Wet compost and wet casing, a tricky combination
Jan 11,
2022
It looks like we are not going to have any winter this season in Europe. On the contrary. It is very wet and humidity is…
Keep an eye on the ball
Dec 14,
2021
At the end of a year or at the start of a new one it is always a good thing to look back and forward.…


