How mushrooms grow and the yields are determined at filling. Assessing the compost and casing soil determines the final quality of the mushrooms. After this assessment, the settings are made on the filling machine. Any mistakes made at filling, will haunt you for the rest of the cropping cycle. On larger farms “growers" focus increasingly less on filling. Just a quick look at the compost and casing soil at the start, set the machine… and that's about it.

Why is filling so important?

Compost quality
Compost quality is influenced by: colour, texture, smell, temperature, hard or soft structure. How much water can the compost absorb and should you water at filling? How well will the CAC material grow? Only paying attention during the first 15 minutes of filling is not enough to get these details right. The least you can do as a grower is to be physically present three or four times at filling, to check the compost, casing soil and the filling quality. And have a chat with the filling machine operator.

The operator also has to be almost a grower; not only with an understanding of the machine, but also understanding what compost and casing soil quality is and how to handle the raw materials correctly. And not what I keep on seeing more often: filling the growing room with compost and casing as quickly as possible and not paying enough attention to the actual filling process. Sometimes the result is a whole groove along the bed because, for example, there was a piece of wood lodged in the CAC axle. There won't be any mushrooms growing there....

The operator should therefore ALWAYS stand by the filling machine and watch the machine where the compost with casing enters the growing room. The operator should look at the CAC and levelling axles. From this position, you can see what you are doing and stop the machine immediately if anything goes wrong.

Filling is the foundation of further growth. It's not simply completing a task, but also thinking about the quality of compost and casing you are dealing with and how it should be handled during filling and afterwards during growing.

Master class
The next masterclass course will be organised from 9 – 14 March 2020. This course is fully booked!

NEW: Live Training Mushroom Signals Essentials
Mushroom Signals Essentials live training will be organised from 8-12 June 2020.
Live training combined with e-learning. E-learning offers the basics, leaving more time for individual questions and farm walks during live training!
Read more by click on this link

Mark den Ouden

The targets for a mushroom farm are amongst others:

• Meet market requirements
• Good quality at the lowest possible harvesting costs

To meet the market requirements the farm needs about the same amount of mushrooms every day, seven days per week. Maybe a bit more on one day than the other depending on sales. This means generally picking seven days per week.

In most of the countries picking in the weekend is expensive so the target is often to avoid that when possible, or have mushrooms which are easy to pick. To have a relatively low cost price for picking it also helps to have more or less the same amount of mushrooms per day. So the planning of the picking and the calculation of the number is pickers needed is easier. To achieve all this a good stagger of the mushrooms is an absolute must. This starts with the choice of casing soil and the way the casing is treated.

A fine structured and perfectly finished layer of casing results often in too many mushrooms and a picking period of only 3 to 4 days in the first flush. So choosing a rough casing with an open finish of the surface helps in staggering the first flush.

Then the next important tool is the fructification or pinning. Take time to cool down the room. Take CO2 and room temperature down gradually over a period of at least 11 days. In the beginning the room temperature can be kept around 20° C for about 2 to 3 days. The compost will follow after a few days anyway.

Build in steps that are the same every day and keep humidity at the setpoint required. 95% for the first 4 days of fructification and from there a drop of 1% per day. Make sure that the band is set narrow on the RH because a deviation of just 2% can cost you the staggering you need so badly. So by taking time in this period, time and money can be saved during the picking again.

Just remember, the more un-even it looks the better. And do not look for too many mushrooms.

Imagine the third picking day of a first flush. In the morning the pickers are picking a beautiful mushroom. Around noon the mushrooms are starting to lose colour and 3 hours later they start growing like mad. Stems are stretching and caps are getting soft.

Does that sound familiar?
In that case look at the casing. If you start checking the casing it is very well possible that it is getting warmer. The differential between ambient temperature and casing temperature is gone. This means that the evaporation has almost or completely stopped. In other words: the casing soil is too dry.

Watering at that moment is too late. If water is applied at this moment the mushrooms will lose the colour completely and bacterial blotch is the next problem.
To solve that problem the grower has to look at the next room where the next flush is coming. In the last days of outgrow water can be given on mushrooms that have the size between a pea and a cherry. Generally, that is about 3 days before the start of the harvest of the first flush. The amount of water can be around 2 litres per m².
Just one watering can be enough to solve this problem.

But only if the rest of the circumstances are okay. A good open and heavy casing soil which can hold that water.
And good selective picking so the outgrow of the flush during the harvest is more gradual and not explosive.
It is possible to detect the moment when the casing is drying out by using an infrared thermometer. If the casing soil temperature is getting up, the casing dries out. The right watering moment is just before that point.

Dry bubble disease may cause a lot of problems because the spores spread quickly. It’s essential to identify and remove the first affected mushrooms to prevent an outbreak of the disease throughout your entire nursery. So how do you remove the first infected mushrooms?

Dry bubble disease is spread by spores. The spores are sticky and are spread by any carrier to which they may adhere, such as people, flies, dust, water, etc.

The best way of preventing the spread of spores is by covering an infected mushroom and removing it. Wet a tissue with a disinfectant such as alcohol or methylated spirits. The spores will stick to a wet tissue. Carefully and slowly place the wet tissue over the infected mushroom without causing any turbulence, which would make the spores fly away. When you have covered the mushroom with the tissue, cover your hand with a plastic bag and pick up the mushroom along with a good amount of the surrounding casing soil. Turn the bag containing the infected mushroom and the casing soil inside out and seal it. Leave the bag containing the infected mushroom in the growing room and dispose of it after you have steamed the growing room.

There are other methods you could use, for example with a plastic bottle. Cut off the bottle’s base, place the bottle over the infected mushroom and fill it with salt.

Whichever method you use, make sure you don’t spread the spores. A single drop of water on an infected mushroom would spread billions of spores over a distance of more than one metre from the mushroom. A few days later you would then see lots of mushrooms showing the first signs of dry bubble disease around that first mushroom.

Regularly check the area from which you have removed the infected mushroom during the next few days to see whether the disease reappears.

More information on how to control dry bubble disease can be found on pages 114-116 of the Mushroom Signals book.

Mark den Ouden

The next Master class Mushroom composting and growing is 21 – 26 October, there are still seat available, more information about the course, click here.

These three principles are the base of disease control on a mushroom farm. To my opinion there is no farm that has not a spot of disease somewhere.
But depending on what is done it will develop into a serious problem or it will stay a hidden time bomb.
If a problem is discovered it is of crucial importance that is recognised. To make sure that will happen training of people on the farm and especially pickers is needed. They are your eyes on the farm.
They need to know the most common diseases and especially in a young stage. Many places of dry bubble are not recognised and are only seen if the disease is in an almost incurable stadium. The small wart on a mushroom or grey spot is often missed.
The same goes for insects. Many growers do not know the difference between a phorid and a sciarid. Although the damage pattern is totally different, so Is the threshold where it really starts costing production. Also the cure is completely different.
Example: growers use diflubenzuron against phorids.
It is only active against sciarids.
If the disease is recognised then it should be isolated. It can be covered on the spot but the most important is to simply keep all doors closed. Check filters and door seals. If a room is infected, make sure the infection is contained in that one room and does not spread on the farm.
After the isolation the disease can be treated. If the spot is detected in an early stage one can do with just a sport treatment. If it is more the whole room should be taken on.
But too often the infection spreads and the whole farm must be treated. Generally room treatment for a full cycle with an overlap of two or three rooms to break the lifecycle of the disease.

So, just a test:
Look at the photo and spot the phorid. Or is it a sciarid?

A lot of farms around the globe are using imported casing soil from Europe. A good, heavy casing soil with a good water holding capacity will give many benefits and are making it worth the investment to import the casing from that far away instead of using other alternatives. However, it’s really important to prepare the casing soil the right way and get the casing on the growing beds the right way, without losing those benefits. Getting a good, consistent casing on the beds will give better yields and quality and let’s go through the process to see what is the best way to prepare and adjusting the casing soil would be.


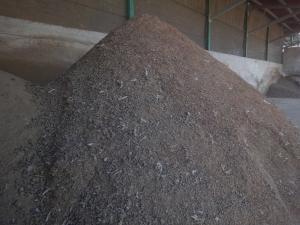
All the big bags transported from Europe have the casing soil inside for some weeks. When stored at site you need to add that extra time. Not hard to understand that the wet, heavy casing soil will get anaerobic spots inside the big bags. Therefore, it would be beneficial to open up the bags a few days before you will use it to open it all up, get it aerated, and get rid of the anaerobic spots. Of course you need a good clean space to do that. Another big advantage of that is that you are able to mix all bags together which will give a much better consistent moisture in the casing. Although the casing companies are trying to get the same moisture in all big bags it’s hard to get that done perfectly all the way through and mixing them all up will improve that.

Not the ideal situation but if there is no clean space available you can unload the casing soil from the big bags directly into the machinery.

Mixing of the bags can be done with a bucket of a loader, a Bobcat or something similar. That way the structure will not get damaged much, just don’t push too hard when driving into the casing and drop it carefully and not too high. After the mixing with the casing lying on a floor you also have the possibility the get the required moisture in the casing up to the required level. Watering can be done on the top of the casing with a water hose but of course make sure to spread that evenly over the whole batch. After being on the floor for one day the water will have the time to get through all the layer of the casing soil and that will also get the PH level more even. Uneven PH levels will give uneven grow speeds of the mycelium.

The casing we use has to deal with different climate periods. Those changes will be occurring all year around and they will change the amount of water you need to adjust the casing with. It’s never a routine job to add water but, same as in the grow rooms, it needs attention and adjusting accordingly.
You can use a mixing machine as well to add water and get it all mixed well, just ensure you don’t break the structure of the casing too much and don’t use augers to mix it. Augers will damage the structure by compress the casing and press out all air between the clumps.


As you see there are a lot of things that can influence the quality of the imported casing. Just make sure to adjust to your current situation and try to get the best result out of it.

Erik de Groot
This email address is being protected from spambots. You need JavaScript enabled to view it.

Cookies make it easier for us to provide you with our services. With the usage of our services you permit us to use cookies.